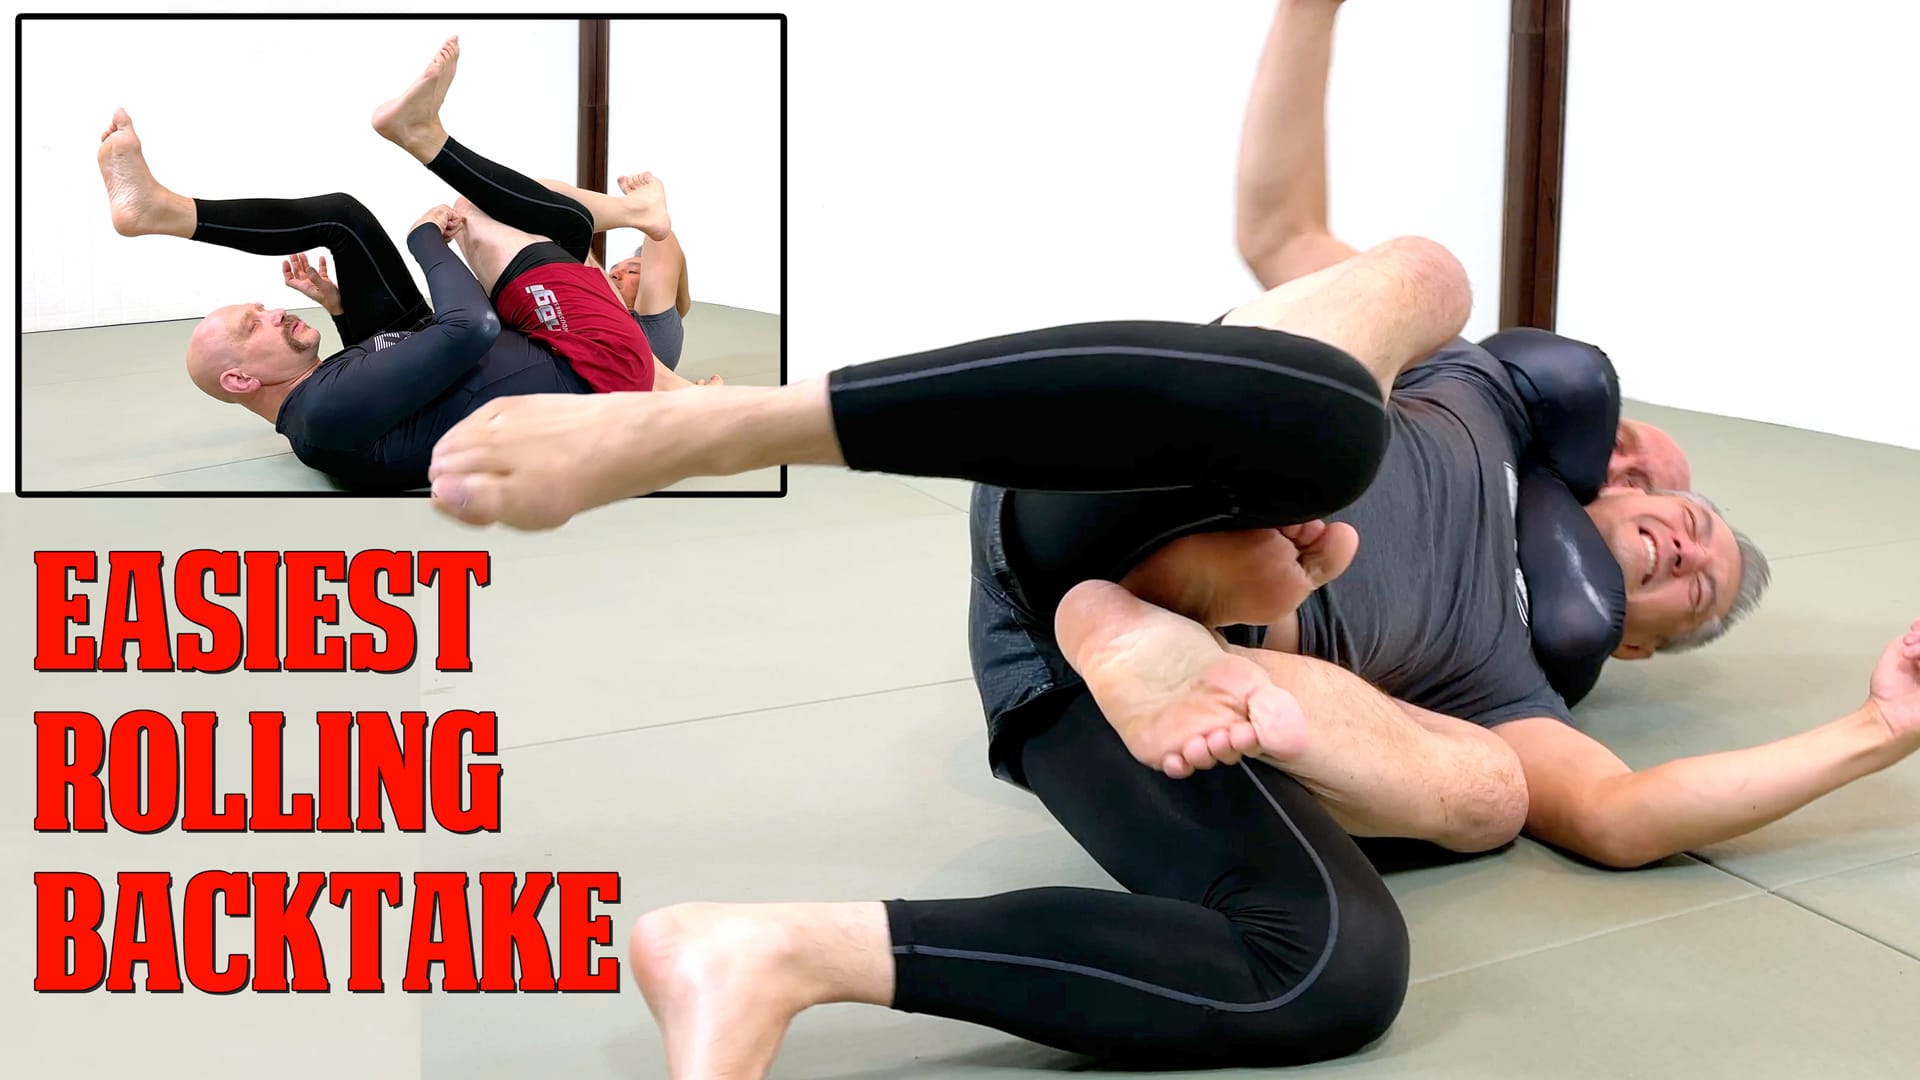
In this article, you’ll get a step-by-step system that anyone can use for hitting your first rolling backtake. The mechanics, details, and steps are all here, so scroll down and check them out!
Table of Contents
How to Do the Rolling Backtake (Video)
Here’s a video I shot breaking down the three essential steps for doing your first rolling backtake.
Watch the video below, practice the steps, hit it in sparring, and then let me know you pulled it off!
Let’s break down these three steps in some additional detail…
Step 1, The Dope Mount Sequence
The first essential component of learning the scissor wedge rolling backtake is to become familiar with a position and sequence known as ‘dope mount.’
Dope mount works in gi-based BJJ, no gi grappling, and MMA competition. It works by trapping his legs in a compromised position with your own legs, and then advancing relentlessly towards the mount.
Let’s review the sequence here..
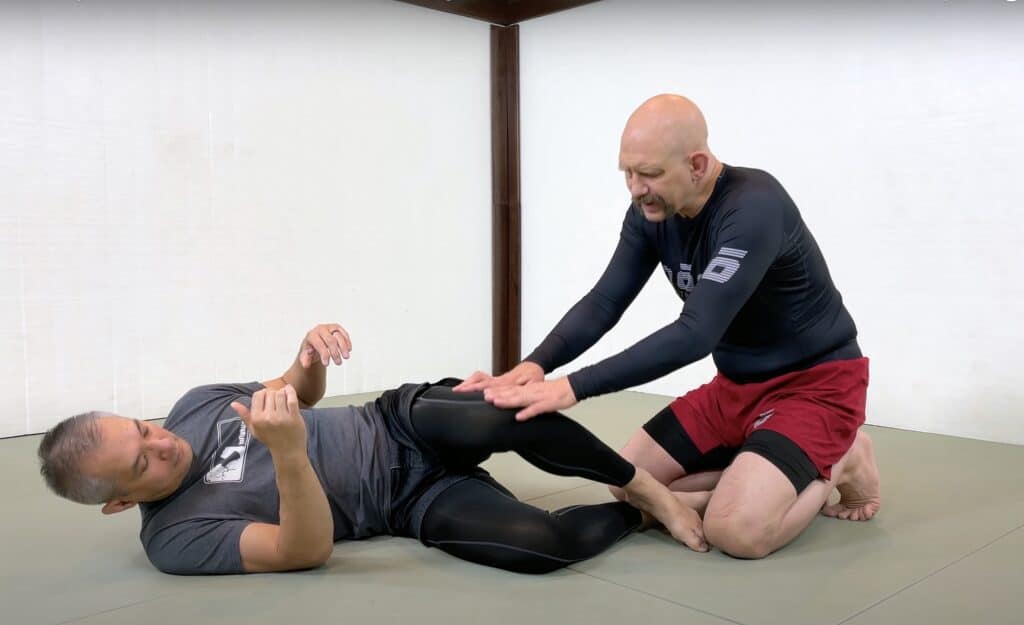
Dope Mount Trigger Position, Both Legs Turned to One Side
A trigger position is an alignment of your body and your opponent’s body that immediately invites a specific technique, be it a sweep, submission or guard pass.
The trigger position for the dope mount is whenever your recumbent opponent has both of his legs turned to the same side.
Sometimes an inexperienced person will give you this position accidentally, but if you’re going against more experienced grapplers then they usually have to be forced into this misalignment with some variation of pressure passing.
There are also many other routes to the dope mount, and learning how to get there becomes increasingly important as you delve into intermediate and advanced applications of the rolling backtake.
Once you recognise this position whenever it occurs you can then take immediate advantage of it!
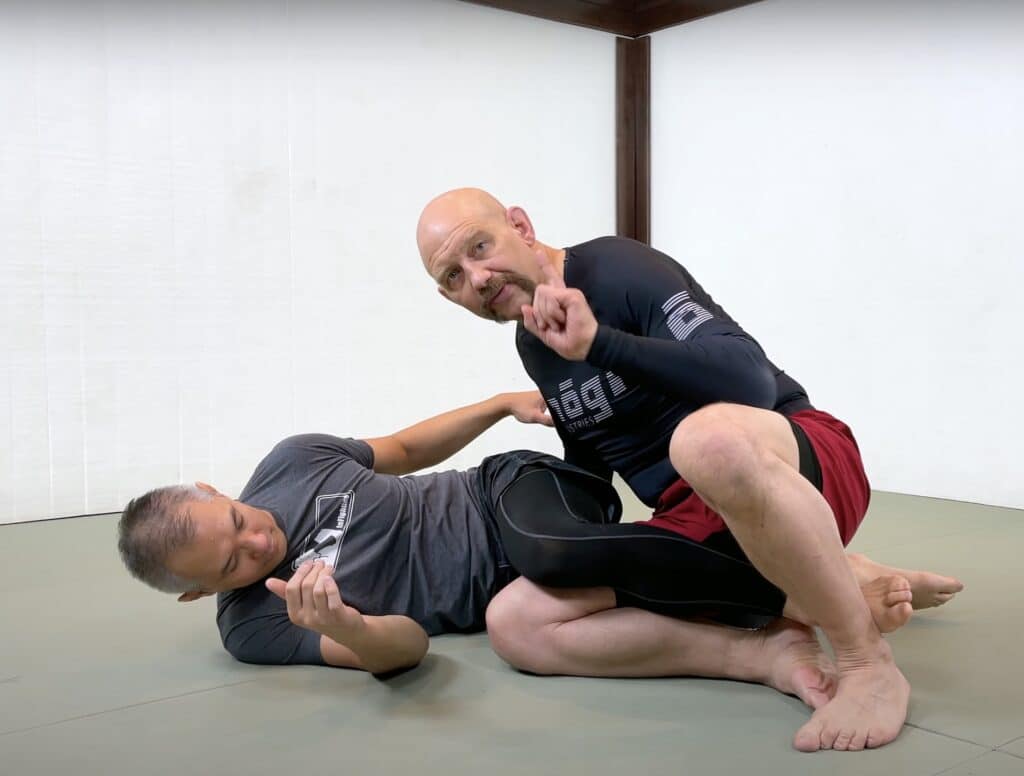
Dope Mount Step 1, Split Your Opponent’s Legs with Your Rear Knee
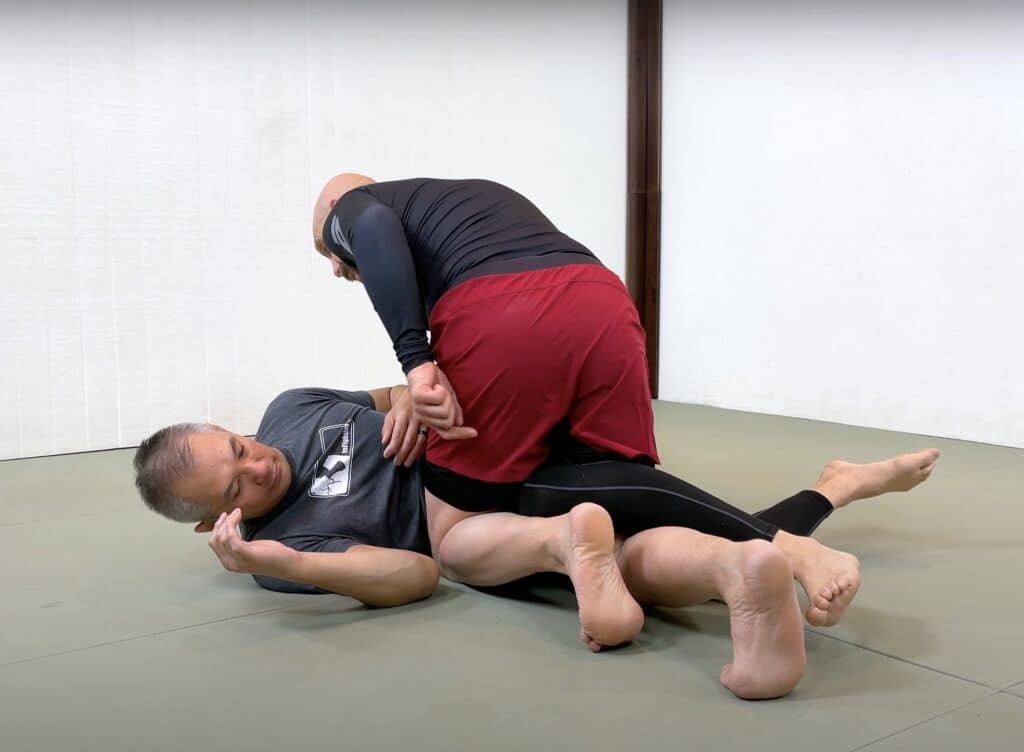
The first step in the dope mount sequence is to take your back knee (the knee that’s closer to his spine) and drive it between his legs.
For example, in the photo above I’m bringing my right knee over Ritchie’s right thigh and slightly underneath his left thigh.
Note that this position ISN’T an effective half guard where your opponent would have lots of options. Rather it’s a twisted and backwards form of half guard that gives him few attacks so long as you don’t give him a lot of room to move.
Dope Mount Step 2, Your Front Knee Comes to Your Opponent’s Belly
Once you’ve successfully split his legs with your back knee in step 1 it’s time to move onto step 2.
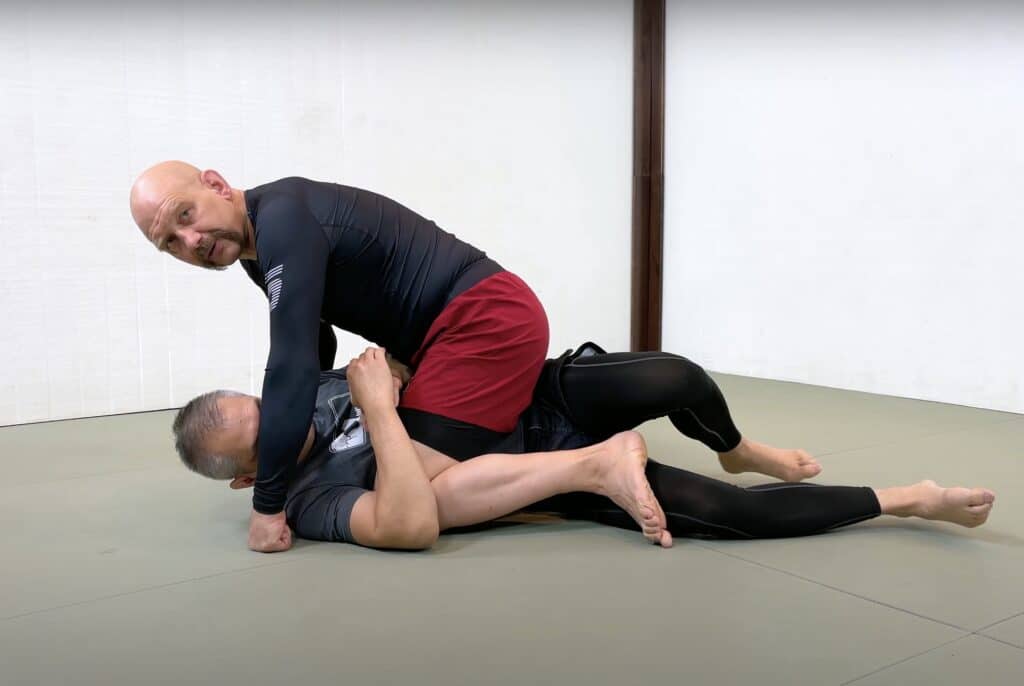
Now bring your front knee (the knee that’s closest to his chest) all the way forward until it’s touching his belly.
By doing this you’ll trap his top (left) thight between your legs, making it even harder for him to move. This is the position we’ll be launching our rolling backtakes from, but for now let’s finish the original sequence.
At the end of step 2 the mount is there just for the taking.
Dope Mount Step 3, Your Rear Knee Advances and Achieves Full Mount
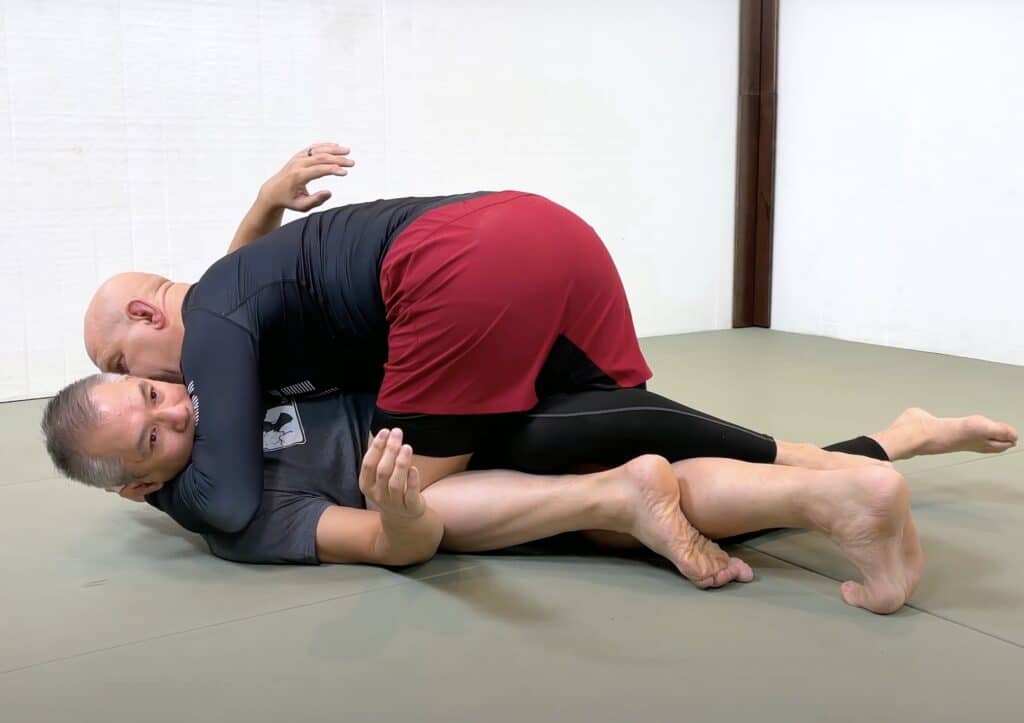
The third and final step is advancing your back leg up and over his bottom leg, and getting to the full mount.
In the case of this particular sequence, I moved my right leg up and over Ritchie’s left leg, bringing my right knee into his left armpit.
The mount is a very dominant position, second only to the back. And we’ll be covering how to get to the back in just a moment…
Dope mount with cross face and underhook
You’re usually NOT going to be doing the dope mount sequence with your body upright.
In the photos above I’m only upright because that makes it easier to see what my legs are doing, but against a struggling opponent I’ll try to control his upper body with cross-faces and underhooks and drive into him with all my weight.
Adding pressure to his upper body while immobilising his legs makes the guard passing process exhausting for your opponent, and eventually he’ll just give you the pass to get the ordeal over with (a strategy also emphasized by 6th degree black belt Fabio Gurgel in the podcast we did together).
Now that you understand the legwork to get into the dope mount let’s give you the second thing you need to hit that first rolling backtake!
Step 2, Scissor Wedge from Leg Wrestling
In a rolling backtake there’s a moment when your opponent flips over and you get access to his back. The easiest way to learn that flip is the scissor wedge mechanism which was covered at 02:56 in the video at the top of this page.
It’s important to note that there are different rolling backtake mechanisms, including the scissor wedge, the twister hook, and the leg bundle. I recommend starting with the scissor wedge because it’s easiest to learn and requires the least flexibility.
To become familiar with the scissor wedge let’s revisit leg wrestling, which is a game you may have played as a kid…
Leg Wrestling Starting Position
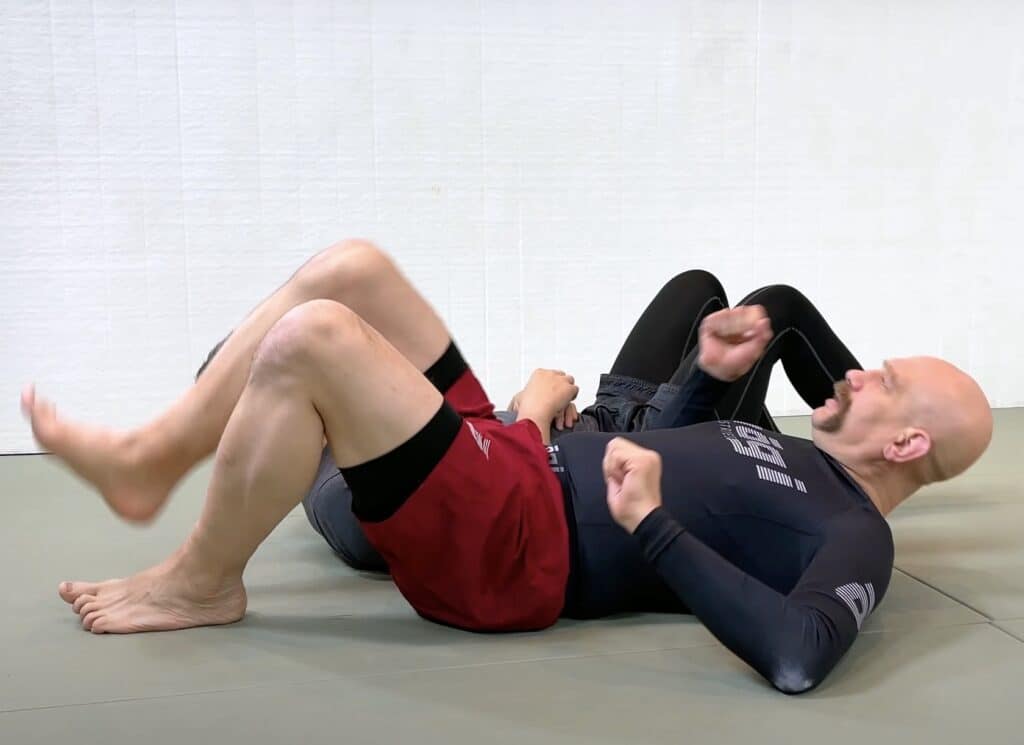
To start the leg wrestling game, my training partner and I lie side by side with our heads in opposite directions. My shoulders are at his hips, and my hips are at his shoulders.
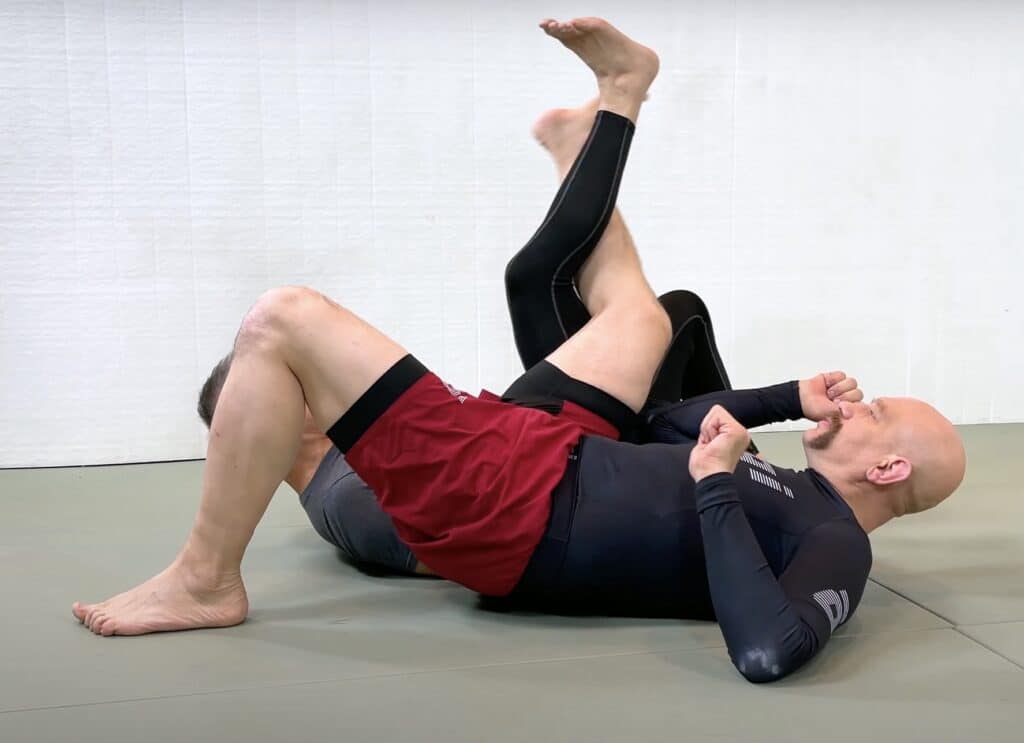
Leg Wrestling Legs Hooked Position
We now fling our inside legs (in this case our right legs) up and hook them together at the kneepit.
To win a traditional leg wrestling match from here my goal would be to kick with the leg in order to lift my opponent’s hips off the ground and make him do a backwards somersault.
But this is NOT what we want to do in jiu-jitsu. What we would prefer for grappling is to achieve the scissor wedge position…
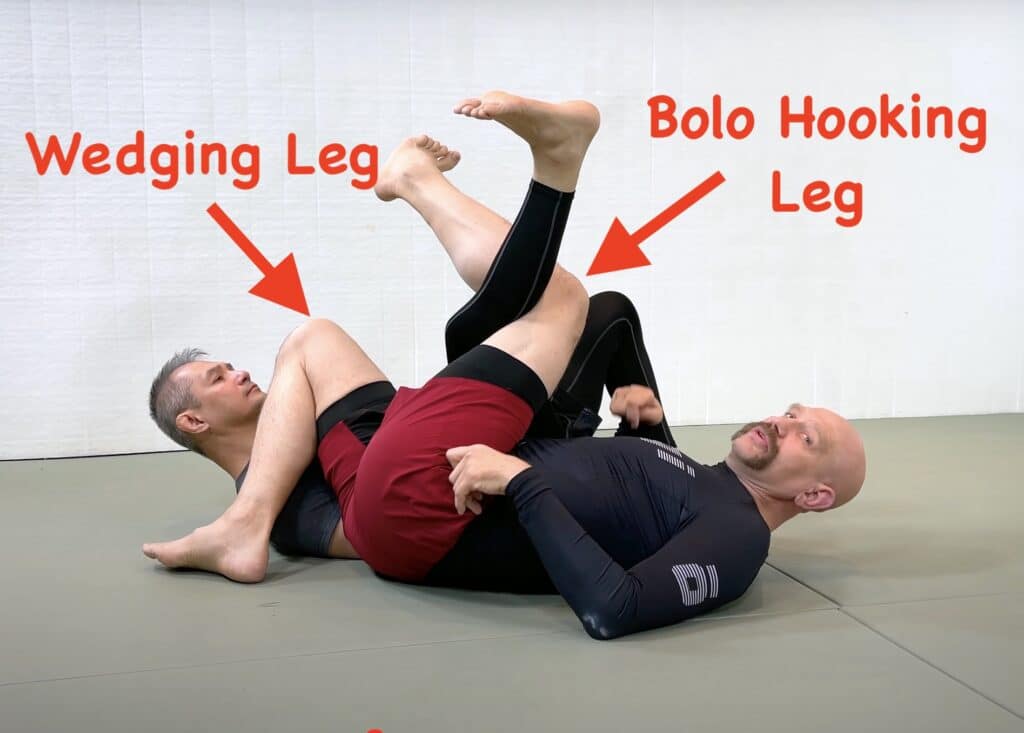
Bolo Hook and Scissor Wedge Backtake Position
In the scissor wedge position, your outside leg hooks his inside leg, while your own inside leg is bent and is positioned in his hip crease.
(Your outside leg hook is sometimes called a ‘bolo hook’ because it’s very reminiscent of the hooking action you use when you’re doing the berimbolo backtake, which is essentially a rolling backtake from guard. Fortunately the rolling backtake we’re working on today is much easier to do and requires less flexibility than the berimbolo.)
Once you have your legs locked into this advantageous position it’s time to take his back!
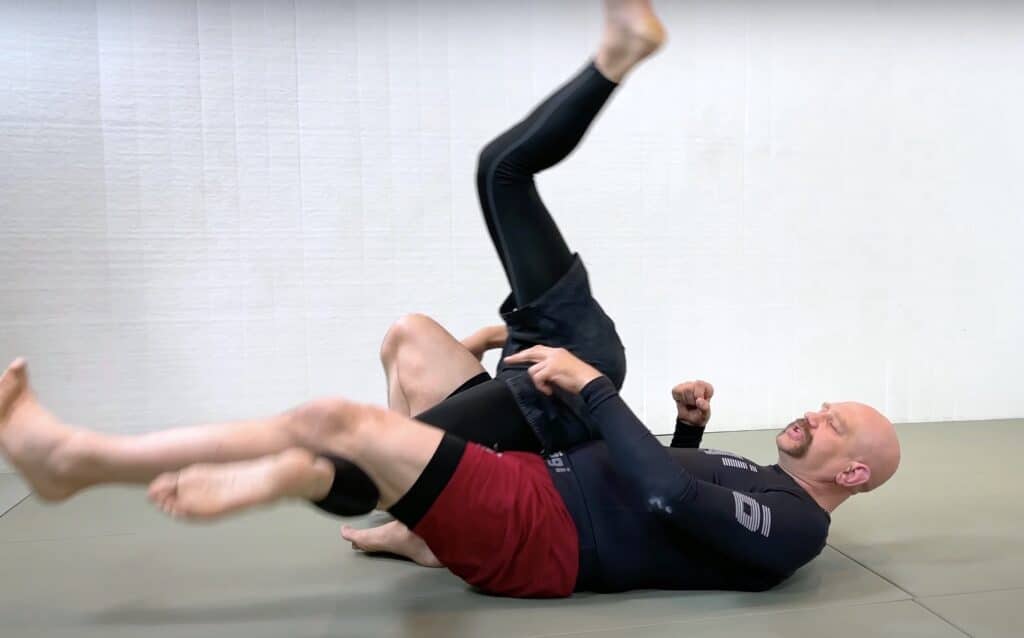
Kicking in the Scissor Wedge Flips Your Partner Over
Now you’re going to kick with your outside leg – the bolo hook – pushing against his kneepit with your kneepit.
If you just used your outside leg he might slide away, but your inside leg – the wedge – stops the movement of his hips by acting like a large wheel chock. Now when you kick your outside leg it drives his body up and over that wedge, which flips him over and exposes his back.
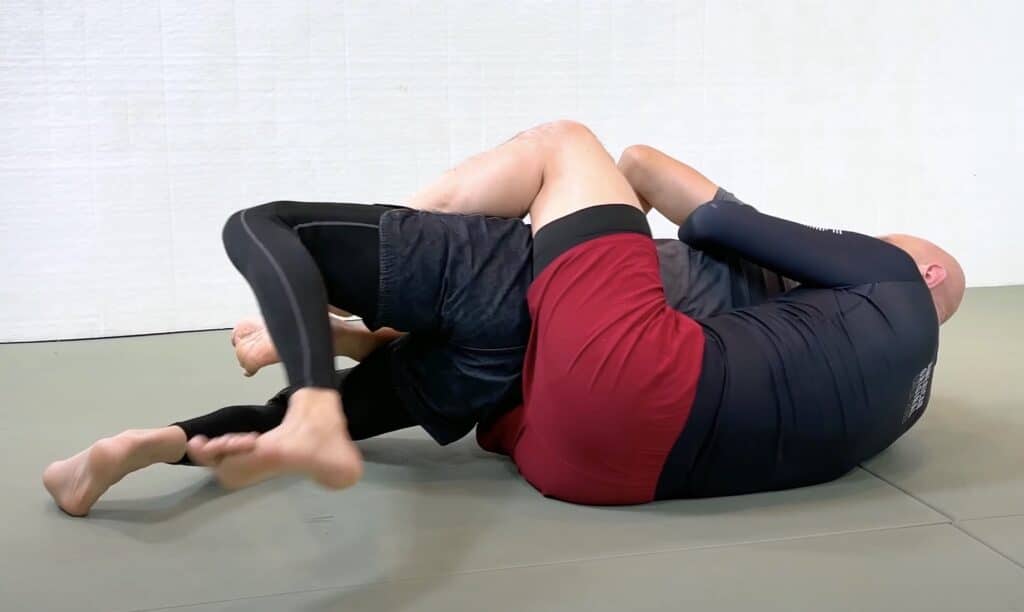
Climb to Your Opponent’s Back
As you’ll see when you experiment with this move yourself, at the end of the scissor wedge motion your opponent should end up with his back turned to you and one of your hooks already being in.
Now it’s normally a simple matter of putting your second hook in,achieving over-under control of his upper body, and hunting for a submission like the rear naked choke.
Step 3, Dope Mount to Rolling Scissor Wedge Backtake
Now let’s put the components together into a realistic sequence that you can use in sparring. This should be relatively easy because you’ve already mastered the most difficult parts in the two steps above…
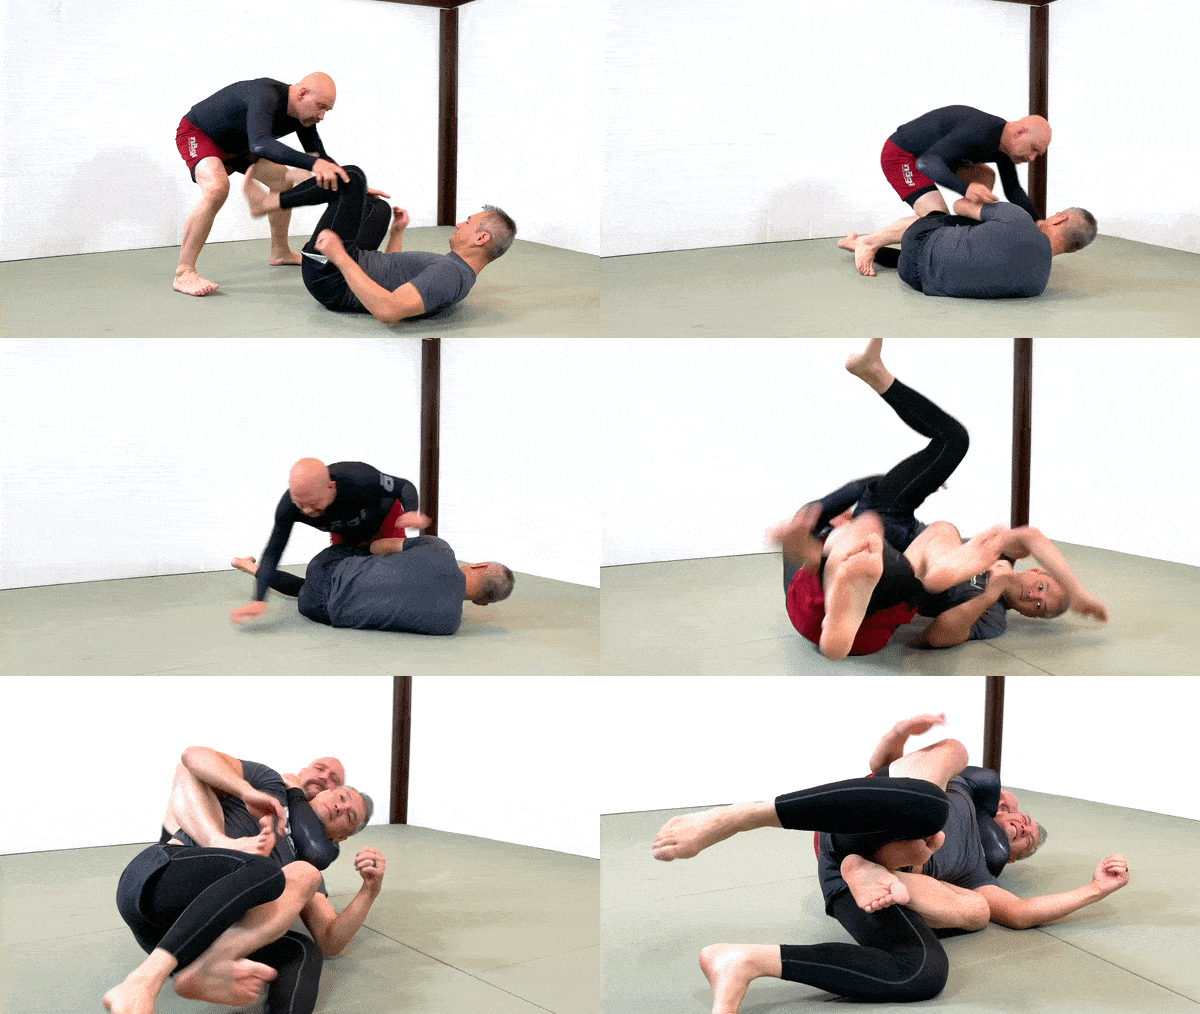
Rolling Backtake from Standing
Here are the relevant steps…
- Start standing, controlling the legs of a recumbent opponent
- Circle to the side and flatten his legs to the ground
- Split his legs with your trailing knee
- Bring your top knee in to his belly to achieve dope mount
- Face his legs and roll over your shoulder to get to the scissor wedge position
- Kick your outside leg forward to flip him over
- Secure your upper body grips and lower body hooks to establish back mount.
If you want a more detailed breakdown of this sequence then go to the 5:37 mark of the video at the top of this page.
The Most Common Rolling Backtake Mistake
As the name implies, a scissor wedge backtake requires BOTH a scissoring kick with your leg AND a wedge.
In the heat of the moment most people remember how to do the kick, but often forget about keeping a strong wedge; they let their wedging leg go straight and everything goes to hell.
Without that wedge a non-cooperative opponent will be able to keep his back on the ground and just slither away. All that work wasted and opportunity squandered, just because you couldn’t keep the heel of your wedging foot glued to your butt.
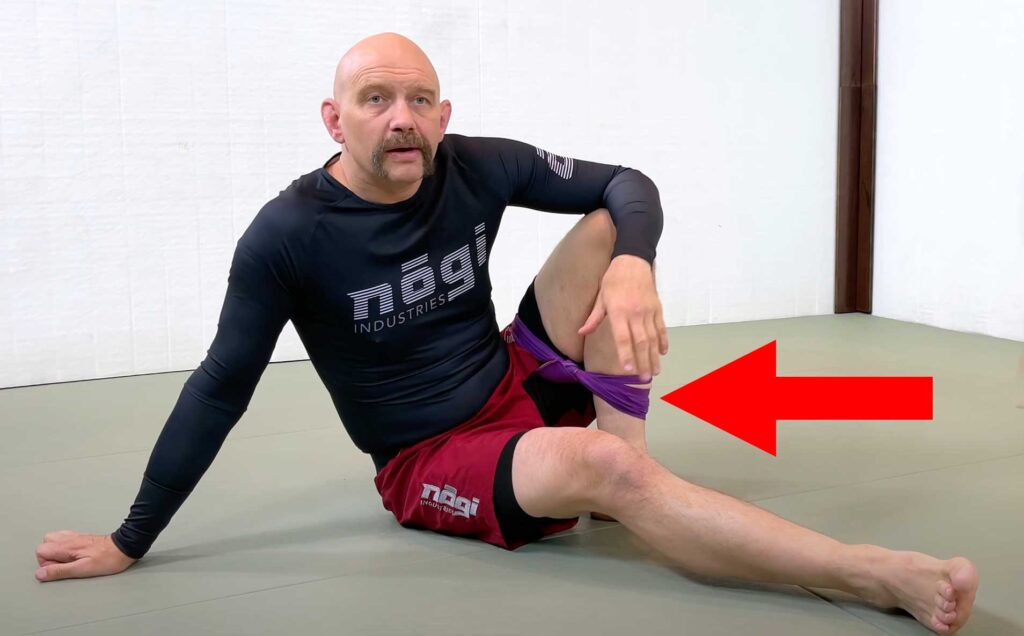
Keep the Heel of Your Wedging Leg Tight Against Your Butt
In the video, I half-jokingly suggested that you tie your thigh and lower leg together to keep them in the right position. I’m not saying that self-bondage is the only answer, you do you, but make sure to do what you have to do to keep your wedge strong!
Examples of How to Apply the Rolling Backtake
Once you’ve mastered these steps it’s time to take the confidence you’ve acquired and build out your rolling backtakes system. At a minimum, you should learn the other backtake mechanisms, the entries, followups, drills and counters.
Here from Rolling Backtakes for Everyone are three examples of how you might use the rolling backtake attack in a variety of situations…
ROLLING BACKTAKES FROM STATIC POSITIONS
You can use rolling backtakes to upgrade your position from static pinning positions. Here’s a cool example of how you might use it to go from the mount to the back…
ROLLING BACKTAKES FROM GUARD PASSES
Guard passing presents many opportunities to hit the rolling backtake, bypass his legs, and go directly to his back. Here’s an example of what that might look like vs butterfly guard…
And here’s another example of how you might use a rolling backtake to deal with the Single Leg X Guard…
ROLLING BACKTAKES TO COUNTER LEGLOCKS
In the last 5 years rolling backtakes have become increasingly important for shutting down leglocks and to punish leglockers for their evil ways. Here’s how to use the scissor wedge backtake to counter a terrible heel hook from the 411 position…
The Best Resource for Rolling Backtakes on the Internet!
Rolling backtakes give you the ability to have a highlight reel finish from anywhere. But they’re a lot easier to do than most people think.
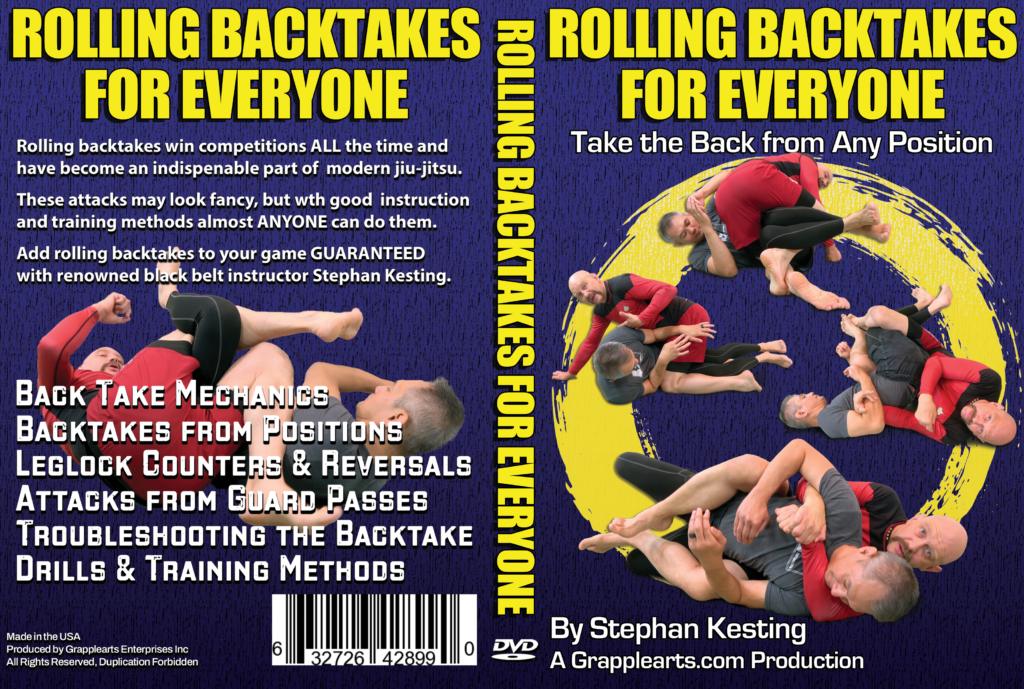
In the BRAND NEW Rolling Backtakes for Everyone instructional you’ll learn exactly how to take your opponent’s back from everywhere using our simple to learn, easy to do rolling backtakes system.
These techniques look spectacular, but with the right methodology, doing them is as simple as a shoulder roll. If you can do the basic jiu-jitsu warmup, then I guarantee that you can hit this move!


