An Article by Brad Parker
Brad Parker runs Defend University (www.defendu.com), a research and development group dedicated to the exploration of leading edge techniques and strategies for self-defense, security and defensive tactics.
Brazilian Jiu-Jitsu burst onto the scene in America when a quiet, good-looking Brazilian named Royce Gracie shocked the martial arts world by winning the first Ultimate Fighting Championship in a seemingly effortless fashion. What the rest of the world didn’t know is that the Gracie family had been developing this art for the past 75 years in Rio de Janiero. What’s become known as Brazilian Jiu-Jitsu (BJJ) proved to be a dominating factor in mixed-martial arts tournaments throughout the 1990s’.
The public safety sector picked up on its success and now agencies such as the FBI, DEA, and LAPD and various elite groups of the military including the Rangers, Delta Force and Marines have included the techniques of Brazilian Jiu-Jitsu in their curriculum.
“With this you are able to survive long enough for help to get there,” says Pat “Hawk” Hardy, long-time law enforcement officer and current assistant district attorney and criminal investigator for Jasper County, Texas. “The thing that makes it great for law enforcement is that it’s easy to learn, you don’t have to be super athletic and it is effective.” Hardy should know what he is talking about – he has 35 years of martial arts experience with a national full-contact karate championship title won in 1975. In 1977 he fought for the world full-contact karate title. “What I like about Brazilian Jiu-Jitsu is that it’s easy to do,” he says. “Most of your criminals out there have plenty of time to workout and get strong, a lot more time than you or me with a family and trying to make a honest living.”
BJJ Reduces Injuries, Claims
According to Sgt. Greg Dossey of the Los Angeles Police Department, the adoption of Brazilian Jiu-Jitsu into its arrest and control curriculum is good for LAPD officers, arrestees and the community. LAPD now has a curriculum that consists of ground techniques based on Brazilian Jiu-Jitsu, as well as the traditional joint locks and “pugilistics” or striking techniques.
In the first two years the techniques were introduced, Dossey says there was a 19 percent reduction in injuries to arrestees and a 8.5 percent reduction in injuries to officers. There was a 13 percent reduction in excessive force claims against the department and a nine percent drop in civil actions filed against the city. He says 6,400 officers have been through the 40-hour program and they receive continuing training three times a month as well as bi-annual divisional training and an annual recertification. “We don’t try to make them the world’s most skillful grappler,” says Dossey, “but we definitely give them enough skills to develop confidence on the ground.” He attributes a 24 percent decrease in the use of force reported in all arrests to that increased officer confidence.
Advantages for Public Safety Personnel
The reality-based techniques and the emphasis on controlling the subject makes Brazilian Jiu-Jitsu perfect for public safety personnel. The techniques put you into a position where your opponent cannot strike you, but you could, if you chose to, strike him. This gives officers and public safety workers an option to increase the escalation of force. The techniques also allow a smaller officer to wear out a larger and more aggressive subject. The techniques do not rely on pressure points for pain compliance. The bulk of the techniques center on joint locks and carotid restraints.
This means that the officer does not have to be stronger than the suspect, they only have to be stronger than the suspect’s weakest point – usually his elbow, shoulder, ankle or neck. The techniques are relatively easy to perform and are quickly picked up by students. In fact, we’ve had students with as little as two training sessions report using the techniques successfully in securing an arrest. The responses of opponents to the techniques and strategy of BJJ practitioners are amazingly predictable, allowing skilled practitioners to appear almost magical in their ability to maneuver the subject.
Many martial artists and defensive tactics instructors tell their students to “never go to the ground” with a subject because of the dangers to be found there. However, Brazilian Jiu-Jitsu practitioners aim for the exact opposite outcome – their goal is to almost always take the fight to the ground. Both LAPD statistics and the Gracie family assert that between 65 to 85 percent of altercations eventually end up on the ground anyway. The Gracies have made a career of training to live and feel comfortable in the position which has the greatest probability of occurring. Conversely, when you stand up in an altercation, the variables for you concerning distance, weapons, strikes and movement are theoretically infinite.
Unfortunately, the momentum of any fight can be reversed instantly by your opponent when he lands a lucky punch or kick, but on the ground everything slows down and the opponent cannot generate much force behind his strikes. Here are the ten Brazilian Jiu-Jitsu techniques you should know:
1. The Clinch
The most dangerous distance in any altercation is kicking and punching range.
Unfortunately, most social interaction is done within punching range. The BJJ practitioner wants to either be all the way outside of hitting range or all the way inside of hitting range. Therefore, most often the BJJ practitioner will close the distance between himself and the opponent to the clinch, which controls the subject and limits his punching and kicking ability. Often an attacker is surprised when you close with him instead of backing up which is what most people do when attacked.
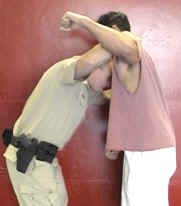
To safely close the distance into the clinch, you must get your head against the opponent’s chest which puts you inside of his punching range, effectively negating his punches .Closing the distance with the clinch puts you inside the arc of his punches.
Clinching Details:
- Get your hands up to your forehead with your forearms protecting your face like a train’s cowcatcher. Your fists tightly are locked against your forehead and your elbows are leading forward, protecting your face against a punch.
- Move into your opponent by leading with a leg check or a distracting kick to his leg.
- As you close the distance, sweep your hands out like you are swimming the breast stroke to block both of his biceps on each arm. Trap his arms by hooking your hands over his triceps and using your forearms to control his arms. You have your forehead tight against his chest while hooking over the back of his triceps. By pulling in on his arms and pushing with your head against his chest, you develop isometric tension, which limits his punching and movement.
- Now, complete the clinch by reaching around his back with one arm and moving to that side. For LEOs (Law Enforcement Officers), move to your gun side. Trap his other arm tightly under your armpit and protect your face by burying it in the biceps of his trapped arm. Pinching your thighs on his leg closest to you limits his ability to turn and knee you to the groin.
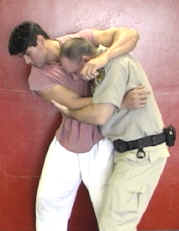
Final position of the clinch, controlling the suspect from the side
Now I have control of the subject with one arm around his waist, which I can secure by holding his belt or clothing. This should be my gun arm. I can release my hold to either protect my sidearm or to draw it as needed. With my other arm I am trapping his arm under my armpit and holding the back of his elbow to hold it and use it as a shield for my own face. Finally, I am controlling his leg closest to me to limit his movement and to protect against a knee to the groin.
2. The Rear Takedown
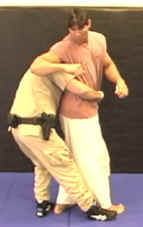
Often, the next move from the clinch is the rear takedown, but this takedown can also be effective when used during a standard search with the subject against a wall or vehicle. Officer preparing to execute the rear takedown. The suspect has turned, the officer is protecting his head and has blocked the right foot of the suspect before taking him down.
- If the suspect begins to resist, clasp him around the waist from behind much like you did in the clinch with your head down to avoid any elbow targeted at your face.
- Move your foot out block his far foot (for example your right foot steps out to the right to block behind his right heel).
- Sit down to drag the suspect to the ground, tripping him over your outstretched leg. He can’t catch his balance because you are blocking his foot from stepping back.
- Roll on top of him for the mount.
3. The Mount
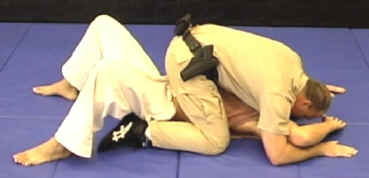
The mount is one of the trademark positions of Brazilian Jiu-Jitsu. The position allows you to control your opponent with a minimum of effort by using your body weight. Opponents often exhaust themselves trying desperately to escape this position. You also have the advantage of being able to strike your opponent, but they have very little leverage to strike you.
- Officer mounted on suspect. Note officer protecting duty weapon by controlling suspects arm.Sit astride of your opponent’s chest.
- Put both knees on the ground and slide them as high into his armpits as possible.
- Both of your hands should be spread out wide braced on the ground for balance and to counter your opponent’s attempts to roll over. Guard your duty weapon by sliding your gun side hand under the suspect’s arm on that side. Stretch your gun hand high above the suspect’s head to force his arm up and away from your weapon.
- Relax your body and become dead weight on the suspect. You can pin his head to the ground to limit his body movement by pushing your stomach against his face.
4. The Back Mount
This is exactly like the mount with the exception that you are astride the suspect and he is face down. You will find yourself in this highly advantageous position a surprising number of times when you start mounted on an opponent as in #3 above. In their effort to escape, almost everyone rolls onto their stomach. Relax the grip you have with your knees when you are mounted and allow them to roll onto their stomach — it’s a better position for you to begin cuffing anyway. Wrestlers are especially susceptible to this since they have trained to stay off their backs.
5. The Closed Guard
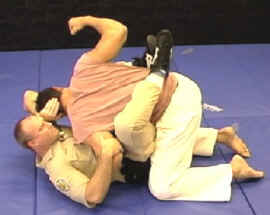
Conversely, the BJJ practitioner stays on his back to control you with his legs in the closed guard, a position that the Gracies are particularly adept. It is primarily a defensive position, but allows you to control a suspect that has overpowered you. Closed guard used to control larger, more powerful opponent.
- When you are on your back, face the opponent and wrap both of your legs around your opponent so that his body is in between your thighs. The higher on his torso you can wrap your legs the better.
- Use your legs to pull the suspect towards you.
- Capture one of his arms by trapping it under your arm and grabbing behind his elbow. For a civilian, this would be the arm he is trying to punch you with, but the LEO will have to secure the arm closest to his own weapon for safety.
- Use your other hand to hold his head down both to limit his ability to sit upright and to guard against his using it to headbutt you. You can either hold the back of his head as pictured above or by the back of the neck. Block his punches to your head with your elbow and punches to your ribs with your elbow and knee.
Hold him here until the cavalry arrives. Be cognizant of your weapon. You can keep him from reaching it by either holding his arm tight under your armpit or using your knee in his bicep to push his arm away from your holster. I don’t advocate finishing techniques like cross chokes, box chocks or guillotine chokes that use both of your arms and leave your duty weapon exposed.
6. The Kimura
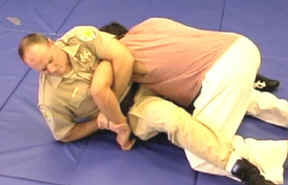
Used as either a weapon-retention technique or an armlock when you have the suspect in your guard, this move is not named by the Gracies, but many BJJ circles call it the “Kimura” after a Japanese judo champion.
- Grab the wrist of the hand reaching for your holster.
- Unhook your legs and place both feet on the ground.
- Securing his arm with a figure 4 hold, sometimes called the Kimura.Sit up and reach all the way over his shoulder of the arm that you have trapped. You will have to scoot your hips back away from him to have enough room to reach over his shoulder.
- Reach in between his arm and his ribs to grasp the wrist of your arm that has seized the suspect. This grip is sometimes called a “Figure 4”.
- Using the leverage of your feet on the ground and the Figure 4 grip you have on his arm, drive his head forward toward the ground as you scoot out to the same side which has the armlock.
- Control the suspect by holding his arm tight to your chest so that it is bent in a shape like an ‘L’. One of your legs will be under the suspect. Place your other leg over him and cross your ankles to keep him from escaping.
Now that you have the suspect controlled and his arm bent behind his back, you have the option of holding him until backup arrives or you can continue to scoot out from under him and begin cuffing him.
7. The Open Guard

If the suspect is too large or too strong to contain in your closed guard, you will need to switch to an open guard to push him back.
- As he sits up to begin punching you, thrust both of your knees into his chest.The police officer might have to use the open guard (one variation shown here) against an extremely strong and aggressive suspect.
- With your head back on the ground and your hands up to protect your face, arch your back and push him back to keep the distance you need to keep from being struck.
- If he reaches for your weapon, be prepared to pull him into your closed guard and perform the Kimura noted above.
If he stands up, you might need to switch to an alternate open guard position:
- Put your back on the floor and your feet on his hips, using them to control his distance.
This also works well for someone trying to choke you from the front:
- Trap one or both of his arms that he is using to choke you.
- Place your feet on his hips and pull him forward until his head is even with yours.
- Use your legs to pick him up and flip him over your head. As you get skilled at this throw, you can control the opponent on the way over and roll up onto him in a mount position.
8. The Cross Side
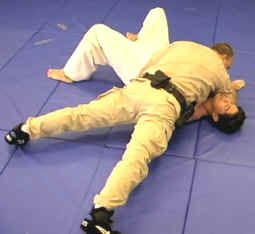
This is another major BJJ position that uses body weight to control the opponent.
- Center your torso over the suspect so that you are sternum to sternum.
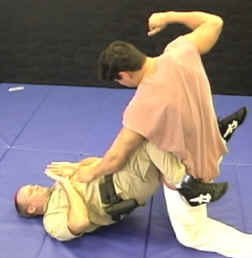
- Cross side position. For continuity, the officer is shown on the left, but in practice, the officer should perform this hold from the other side to keep his duty weapon away from the suspect’s grasp.aise your knees off the ground and stay up on your toes to center more weight on the opponent and to allow you to move with the suspect as he struggles.
- Keep the elbow of your arm closest to his head tucked tightly into his neck or ear to limit his movement. Your forearm should be along the ground perpendicular to his body to provide a brace so you won’t be rolled off.
- Use your other arm (hidden in the photo shown) to hold his wrist or his hip closest to you.
Be aware of your weapon. The accompanying photo shows the officer with his gun side toward the suspect’s head. (All of the photos were shot with the officer on the left for continuity.) It would be preferable to cross side the suspect on the other side so that the officer’s weapon is closest to the suspect’s hip and out of reach of either hand. You can remedy this situation by simply rotating your feet around the suspect’s head and moving into the cross side position on the other side of the suspect (with your weapon down at the suspect’s hip).
9. The Knee Mount

- Control the suspect by placing your knee into, or your shin across, his stomach.Keep your back straight to avoid his punches when using the knee on the stomach control.
- Your other foot is planted firmly on the ground away from the suspect’s head.
- Keep your back straight and your head up to prevent being hit in the face.
It is important that you put almost all of your weight onto his stomach. Primarily this is to use your weight to anchor the opponent, but also it is so your pivot point is centered directly over his body. Your other leg simply provides the balance needed to keep from falling.
The mistake that most cops make is that they keep too much weight on their foot instead of the knee in the belly. If you don’t keep the weight on your knee, he is going to wiggle his hip away from your knee and you are going to lose the knee mount. If you feel yourself beginning to lose the position, simply push your knee all the way across his stomach and assume the mount position.
10. The Rear Carotid Restraint
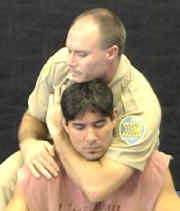
This is one of the major submissions used in Brazilian Jiu-Jitsu. While many police departments are placing severe limitations on the use of carotid restraints, BJJ practitioners have been using them with great success for decades without producing lethal results or even serious injury. The key is to apply the technique correctly.
- You must have the proper position with the rear carotid restraint to avoid damaging the suspect’s windpipe.each deep in front of the suspect towards his stomach, molding your biceps against the side of his neck.
- Bend your arm so that your elbow is pointed straight down and the crook of your elbow is directly below his trachea. This is the key — the space created by the crook of your elbow protects the subject’s windpipe. There should be no pressure on his trachea.
- Reach up high and grab your own shoulder or simply grasp a handful of your uniform shirt.
- Now your biceps and the inside of your forearm are pressing on the sides of his neck, but there is still no contact made on his windpipe.
- Place your free hand behind his head and use it to push the back of his head forward.
- Push the elbow of your arm that encircles his neck into his chest like you are squeezing it towards his spine. This usually gets your arm under his chin.
- Now shrug your shoulders up. The motion is like you are hanging him.
An incorrect, but often too common, neck restraint puts too much pressure directly on the suspect’s trachea.
- An officer attempts the neck restraint, but doesn’t get his arm deep enough around the suspect’s throat, clasping his hands on the suspect’s shoulder.
- In this position it is most likely that the officer will pull backwards with the muscles of his upper back and arms which draws his forearm directly across the suspect’s trachea.
“In all my years of martial arts and law enforcement, I’ve never seen anything like BJJ,” says Hardy. “It is a great equalizer, as important to an officer as having a pistol.”
Visit Defend University (www.defendu.com) for more information
